Building Faster | Smarter | Greener

Leave Your Message

How to Make a Container House Ready for Living in 2026?

Making a shipping container comfortable in 2026 requires more than adding furniture and fresh paint. A real Container House Ready for living must manage insulation, ventilation, moisture, safety, and daily convenience. The steel shell looks strong, but it can become extremely hot in summer and cold at night. Condensation may collect behind wall panels. That hidden water can damage insulation before anyone notices.

This guide explores practical decisions for turning a container into a reliable home. It considers layout planning, structural openings, thermal insulation, plumbing, electrical systems, natural light, and efficient storage. A qualified engineer should review major cuts, reinforcements, and foundation conditions. Licensed professionals should also check electrical and plumbing work according to local building requirements. Rules differ by location. Never assume a design approved elsewhere will suit your site.

Small details matter. A raised foundation can improve drainage beneath the container. A continuous insulation layer can reduce thermal bridging along the steel walls. Operable windows can support cross-ventilation, while a quiet extraction fan helps control bathroom humidity. Still, no plan is perfect. A wider window may improve daylight but weaken the wall. A larger bathroom may reduce valuable living space. Early budgets often miss delivery access, crane costs, site preparation, and utility connections. That is where careful review becomes essential.

The goal is not to make a container appear residential. It is to create a safe, durable, and genuinely comfortable home. Expect revisions. Measure twice. Build thoughtfully.
How to Make a Container House Ready for Living in 2026?

Define the Purpose, Budget, and Legal Requirements

Making a container house livable in 2026 starts with a decision, not a floor plan. Will it serve as a permanent home, guest room, rental unit, or emergency workspace? That purpose changes insulation, plumbing capacity, accessibility, insurance, and approval pathways. The 2024 Permanent Modular Construction Report valued North American activity at $20.3 billion in 2023. However, a shipping container is not automatically a compliant modular dwelling. Treat the report as market context, not a construction shortcut.

Build a location-specific budget before ordering steel boxes. Include land preparation, engineering, crane hire, transport, foundations, insulation, windows, utilities, finishes, taxes, and inspections. A 2024 industry cost survey placed construction at 64.4% of a new home’s final price. Use that benchmark carefully; container projects often hide site costs outside the unit price. I once underestimated drainage and electrical upgrades. That mistake was expensive. Keep a 15% contingency.

Before signing a supplier contract, ask the planning office for written zoning guidance. Confirm setbacks, permitted use, height limits, parking, stormwater rules, and heritage restrictions. Then hire a licensed professional to check structural loads, fire separation, egress, moisture control, and local wind or seismic demands. Permits usually cover building, electrical, plumbing, and wastewater connections, but procedures differ by jurisdiction. The International Code Council’s 2024 model codes can guide design, yet local adoption controls enforcement. U.S. Energy Information Administration data shows space heating used 42% of residential energy in 2020. That makes continuous insulation, airtight joints, and correctly sized heating equipment practical budget priorities. Do not skip a site survey.

Choose a Suitable Container and Inspect Its Structural Condition

Choosing the right container is the first safety decision in a livable conversion. UNCTAD’s Review of Maritime Transport 2024 places global container capacity above 27 million TEU. That huge fleet includes units exposed to salt, heavy lifting, and repeated stacking. Age alone is not a reliable filter.

Choose a standard-size unit with intact corner posts, top rails, bottom rails, and cross-members. A high-cube container offers extra interior height, but its roof must remain straight and firmly attached. Walk inside during daylight. Light entering through pinholes reveals corrosion. Check the floor for soft areas, chemical odors, and deep staining. Moisture trapped beneath plywood can remain invisible.

Look closely at the doors. They should close squarely without force. Inspect the rubber seals, locking bars, and hinges. Measure diagonal dimensions if the frame appears twisted. A fresh paint layer can hide serious rust, so scrape suspicious bubbles carefully. The International Convention for Safe Containers requires periodic examination, commonly within 30 months after the previous inspection. Request the inspection plate and repair history.

The World Shipping Council reported 576 containers lost at sea in 2023, although that figure represents a very small share of transported units. It still reminds buyers that containers experience severe loads. My practical mistake was trusting a clean exterior too quickly. A qualified structural inspector should check welds and hidden corrosion before purchase, especially when openings for windows or doors are planned.

How to Make a Container House Ready for Living in 2026? — Choose a Suitable Container and Inspect Its Structural Condition
Container Option External Dimensions Approximate Internal Dimensions Typical Tare Weight Living-Space Potential Structural Inspection Priorities Suitability for a Livable Home
20-foot standard-height container 6.058 m L × 2.438 m W × 2.591 m H Approximately 5.90 m L × 2.35 m W × 2.39 m H Approximately 2,200–2,400 kg Approximately 13.8 m² of internal floor area before insulation and finishes Check corner posts, corner castings, bottom side rails, cross members, roof bows, floor frame, and door alignment. Reject units with severe twisting, perforation, or major corrosion. Suitable for compact living
40-foot standard-height container 12.192 m L × 2.438 m W × 2.591 m H Approximately 12.03 m L × 2.35 m W × 2.39 m H Approximately 3,700–3,900 kg Approximately 28.3 m² of internal floor area before insulation and finishes Inspect the full length of the bottom rails, floor supports, roof structure, side panels, corner posts, and door-end frame. Long containers require careful checks for sagging and torsional distortion. Suitable for larger floor plans
40-foot high-cube container 12.192 m L × 2.438 m W × 2.896 m H Approximately 12.03 m L × 2.35 m W × 2.69 m H Approximately 3,900–4,100 kg Approximately 28.3 m² of internal floor area with more vertical space for insulation and services Inspect roof bows, upper side rails, corner posts, and the top frame for impact damage. Confirm that added height will comply with local transport, planning, and foundation requirements. Generally the most practical single-unit option
20-foot high-cube container 6.058 m L × 2.438 m W × 2.896 m H Approximately 5.90 m L × 2.35 m W × 2.69 m H Approximately 2,300–2,500 kg Approximately 13.8 m² of internal floor area with improved headroom Check the higher roof frame, corner castings, side rails, and evidence of lifting or stacking damage. Verify that the floor remains level before planning interior partitions. Suitable where extra headroom is valuable
Heavily corroded or visibly distorted unit Dimensions may remain nominal but are not reliable for construction planning Measure on site because deformation can reduce usable space Weight varies significantly with corrosion and repairs May require extensive structural replacement before conversion Look for holes, deep pitting, cracked welds, bent corner posts, separated floor members, uneven doors, and water damage. Obtain a qualified structural assessment before purchase. Avoid for residential conversion
Pre-purchase inspection checklist Measure length, width, height, and diagonal dimensions Record floor levelness and usable clearance after planned insulation Confirm tare weight from the unit's identification plate or records Allow space for insulation, ventilation, plumbing, electrical systems, and finishes Check for active leaks, rust-through, structural deformation, chemical contamination, persistent odors, and unapproved modifications. Photograph every defect and record its location. Required before conversion
Ready-for-living performance checks Confirm doors and windows can be installed without weakening primary frames Verify finished ceiling height after insulation and ceiling services Confirm foundation and lifting equipment can support the loaded unit Plan for thermal insulation, moisture control, daylight, ventilation, and emergency egress Have structural alterations reviewed by a qualified professional. Complete electrical, plumbing, fire-safety, energy, and planning checks required by the local authority. Essential before occupancy

Design the Floor Plan, Utilities, Insulation, and Climate Control

A livable container house starts with a measured floor plan, not a catalog sketch. Record door swings, window positions, furniture depth, and daily movement. A 40-foot container may provide useful length, but insulation and service cavities reduce its interior width. Keep plumbing close together to shorten pipe runs and limit heat loss. Leave clear access around the electrical panel and water shutoff. Small decisions matter.

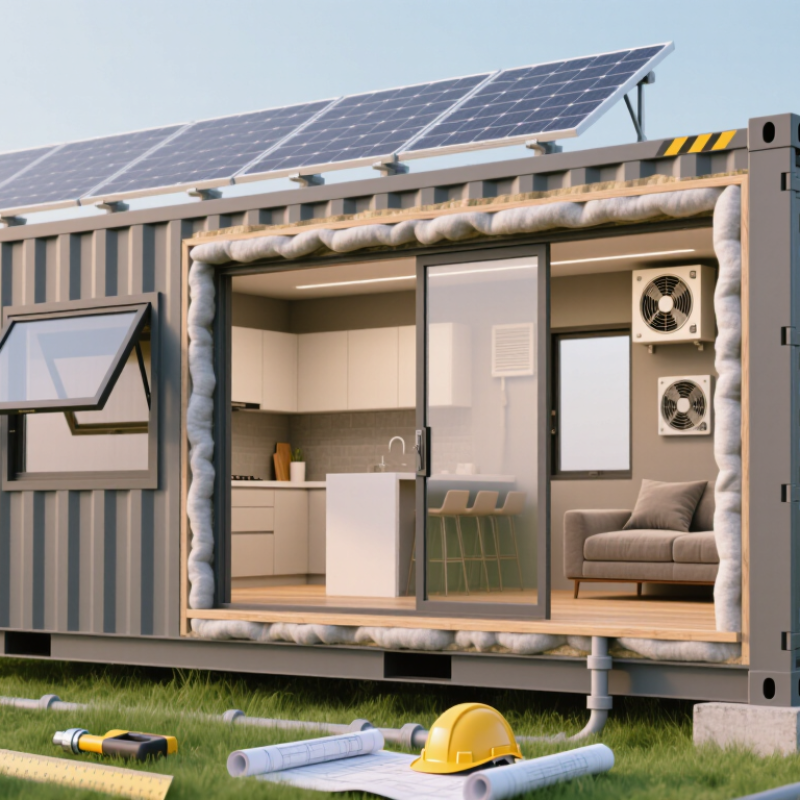
Climate control depends on the envelope. Seal floor, wall, and roof penetrations before installing interior finishes. Thermal bridges around steel framing can create cold stripes, condensation, and hidden mold. The U.S. Department of Energy identifies heating and cooling as major household energy uses, so poor detailing becomes expensive quickly. Use continuous insulation where possible, then size equipment from a heat-loss calculation. Oversized systems may cycle badly and leave rooms damp. They feel powerful, but not comfortable.

Ventilation also needs a deliberate plan. The U.S. Environmental Protection Agency generally recommends indoor humidity between 30% and 50%. A quiet exhaust system, filtered fresh air, and operable windows can support that range, depending on climate. The International Energy Agency reports that buildings consume roughly 30% of global final energy and produce about 26% of energy-related emissions. That figure supports efficiency, but it does not replace local engineering. I would not trust a generic wall assembly. Weather, occupancy, and workmanship change the result. A perfect container plan is unlikely. Test, inspect, and revise before closing the walls.

Complete Construction, Interior Finishing, and Safety Installations

How to Make a Container House Ready for Living in 2026?

A livable container house begins with a careful structural inspection. Check the steel for corrosion, dents, and previous repairs. A qualified engineer should confirm the frame can support new openings, insulation, and roof loads. Reinforce cut sections before installing windows or doors. Seal every joint, but do not trap moisture inside the walls. Proper drainage around the foundation matters too. It prevents standing water and reduces long-term corrosion.

Interior finishing should combine comfort with practical maintenance. Use continuous insulation, vapor control suited to the local climate, and durable wall panels. Leave service access near plumbing and electrical connections. Install a level floor, washable surfaces, and windows that provide safe ventilation. Test water pressure and inspect every drain connection. Small leaks become expensive quickly.

Safety work deserves equal attention. A licensed electrician should install protected circuits, grounding, and clearly labeled shutoffs. Add smoke alarms, carbon monoxide alarms where needed, fire extinguishers, emergency lighting, and unobstructed exits. These details are easy to overlook.

Tips: Keep a photographic record of hidden pipes, cables, and structural repairs. Test alarms monthly. Avoid placing furniture against emergency exits. Ask an independent inspector to review the finished home. My own preference is to leave some design choices unfinished until the first rainy season; condensation often reveals mistakes that drawings miss.

Test Essential Systems and Prepare the Container House for Occupancy

Before moving in, treat the container house like a small technical system, not a finished box. Check welded joints, door frames, roof seals, and floor edges after rain. Look for rust-colored streaks, damp insulation, or soft flooring. A moisture meter helps confirm what your eyes miss. It is easy to underestimate condensation. I have found that one cold corner can signal poor insulation or hidden leakage. Record each defect with a dated photograph.

Test the electrical installation under realistic loads. Run lights, heating, cooking equipment, and outlets separately, then together where appropriate. A qualified electrician should verify grounding, circuit protection, outlet polarity, and the main disconnect. Test water pressure at the shower and kitchen tap. Flush toilets repeatedly and inspect every joint beneath the floor. Small drips become serious inside closed wall cavities. Check hot-water temperature, drainage speed, and any sewage odors. Do not rely on a single successful test.

Ventilation deserves equal attention. Measure airflow in wet rooms and confirm that fresh air can enter living spaces. Test smoke and carbon monoxide alarms, emergency lighting, locks, and window operation. Keep escape routes clear. Review insulation, interior temperatures, and noise during daytime and nighttime. A house may pass a daytime inspection yet feel damp after midnight. Leave a written maintenance schedule for filters, sealants, alarms, and drainage. Some assumptions will be wrong. Revise the checklist after the first week of occupancy, using real faults rather than optimistic promises.

How to Make a Container House Ready for Living in 2026?

Before occupancy, every essential system should meet its verification target. The chart shows practical pre-occupancy benchmarks for electrical safety, plumbing, ventilation, fire protection, insulation, and structural inspection.

A container house should not be occupied until all critical checks are complete, water and electrical systems operate safely, indoor air is adequately exchanged, and smoke and carbon monoxide alarms are installed and tested.